Sunday, June 26, 2016

8:16 / Apricot Troika


Most of my pizzas so far have been inspired by a single cheese. Early on, I was set on a path by paneer. Last week, I wanted to give brunost a try. One cheese I have never thought to put on pizza is Stilton, and I figured it was time. I enjoy blue Stilton well enough, but the white sort I reach for at snack time is more accessible. You see, it's got apricot bits in it [and let's just say it comes from a place that rhymes with "Nader Woes"]. Maybe not dessert-y in an obvious way on its own, but I had my suspicions that with the right bedfellows, this cheese could bring together a perfect brunch pie.


Back at the beginning of 16P, I had planned for at least one fruit pizza. I had pictured oranges or melon slivers, but this Stilton planted an apricot-centric seed. It bloomed into all these images of fresh apricots, apricot jam, nuts, sauces - and juicy nectarine for a bit of variety. There is something about these fruits that just works with nutty flavors [probably their shared spotlight in Middle Eastern cooking] so pecans joined the group. The players were set, they just needed the right stage.


The crust was always going to be something between normal and pastry. Recently I have been making Norwegian cardamom buns, and their soft, fluffy texture and mild sweetness informed this recipe. I modified my crust slightly, including a few smoothing and sweetening touches, using milk rather than water, and just a hint of sugar. I included raw clover honey and cinnamon to add some depth to the flavor. Pizzas aside, I believe this crust stands on its own, functioning as a sort of breakfast flatbread [is there a better word for that?].


While this began as a dessert idea, I wanted something less expected, something to avoid a cloying, sucrose nightmare. It was as simple as going back to Italy. Fresh basil brings life to every bite, and added to a splash of balsamic and pinch of salt [especially good on the crust], this pie was feeling more mediterranean all the time.


Finally, as this was the most outside the box pizza yet, I decided to be cautious and only make one pie. I was stupid so you don't have to be - if you are wise, double or quadruple this recipe. Man cannot live on pizza alone, but damn it, I could eat this every day.

Crust:
3½ cups all-purpose flour
½ tsp salt
¼ cup granulated sugar
¼ cup raw honey
1 tsp ground cinnamon
½ cup + ¾ cup whole milk
1 tsp active yeast
1 egg
Lots of extra flour for kneading

Toppings:
⅓ cup apricot jam or preserves
1 large nectarine
1 apricot
¼ cup chopped pecans
6-8 oz white Stilton [with or without apricots]
1 handful of fresh basil [about 12 leaves]
Sea salt and balsamic vinegar to taste

Prepare the dough first. Mix the flour and salt. Combine ½ cup of warm milk and the yeast [stovetop or microwave is fine for heating the milk, but the stove allows you to monitor the milk temperature more closely, so you don't have to wait for it to cool down to 90º - 100º F if it overheats in the microwave]. Give the mixture a few minutes for the yeast to begin foaming, then add to the flour. Add the additional ¾ cup milk, then the sugar, honey and cinnamon as the dough mixes. This is a snap with a dough hook, but mixing by hand is always an option. 


Once the dough is silky in texture, turn it out onto a floured surface and knead the dough for about five minutes. It will likely be very sticky, so just keep dusting with flour and kneading it in until you have a cohesive ball. Place the dough in an oiled bowl, and leave, covered, in a warm place for one hour.


Once the hour is nearly up, preheat your pizza stone at 500º F. Slice the apricot and nectarine in thin segments. Try for 1/8th of an inch thick. The fruits I used were fairly large, so I recommend having an extra of each on hand if you cannot cover the whole pizza. 


Remove the dough from the bowl once it has risen for an hour. Knead to remove the air bubbles, then roll out or shape with your hands into a 14" circle. Dust your preheated stone with cornmeal, then place the dough over it. Bake the dough for 10 minutes, then remove. After ten minutes, the dough should be slightly golden, fluffy and thick.


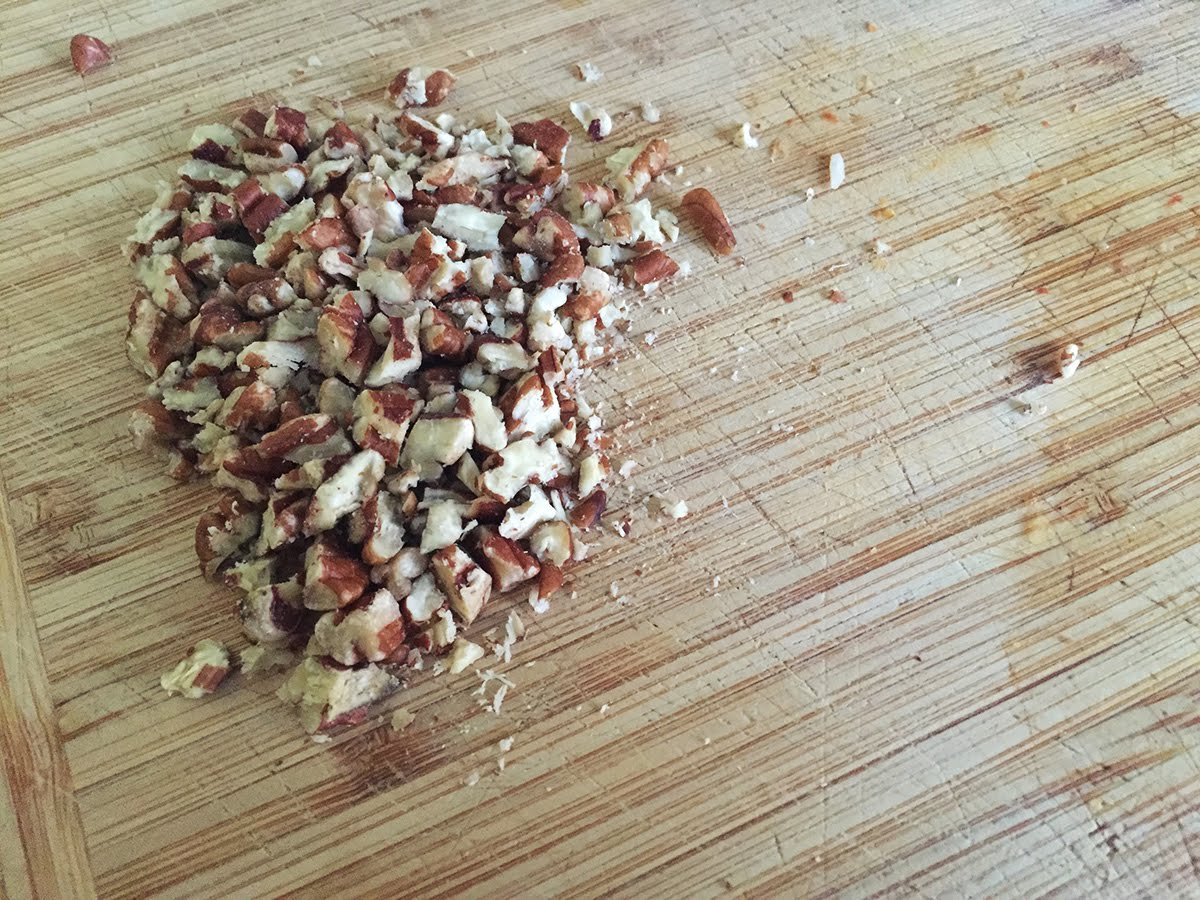
Spread the apricot jam over the dough, then begin layering on the sliced fruit. I formed mine into a sort of pinwheel, purely for aesthetics of course. Crumble the stilton over the fruit, and sprinkle with the chopped pecans. Brush the crust edges with a beaten egg, and pop back in the over for about 10 more minutes. 


The stilton will melt a little, and the fruit may begin to caramelize, but one thing is for certain: the crust will be golden-brown perfection. This is the best crust I have made yet, and while I am sure the sugar has something to do with that, I cite the pre-baking ritual as the real difference maker. Dress the pizza with fresh basil leaves, and serve each slice with a drizzle of balsamic vinegar and a sprinkle of sea salt.

Wednesday, June 22, 2016

7:16 / Not Grandiosa


There is a cultural institution in Norway called Grandiosa. It is a name so synonymous with frozen pizza that the brand has become shorthand for the product. I have had the idea of Norwegian pizza in the back of my head since this project began, so Grandiosa seemed a natural source for inspiration. Unfortunately, my research [including a sampling of a tuna-topped pie during my recent travels in Scandinavia] has revealed that Grandiosa is no different from anything you find in America. And unless we're talking steak, hot tuna repels me. So I set aside the most relevant part of pizza culture in Norway, and instead thought about Norwegian food as a whole. Except not fish. No power on Earth can compel me to put fish on a pizza.


I find the Scandinavian palate is typically bland, and working within its constraints requires creativity if you want to get much flavor. I did my best, and the result is a plain cheese pizza with just enough of a twist to make it unique. I went for a rye crust, inspired by what may be Norway's greatest contribution to world cuisine, the open-faced sandwich. I chose to use vodka tomato sauce, which felt more northern, a geographical compromise that respected the Nordic route while staying true to the Italian medium. The cheeses are two greats from the land of the fjords - Jarlsberg and brunost.


Jarlsberg has a wonderfully nutty, Swiss-like flavor, and brunost adds a caramel tang. If you are unfamiliar with brunost, I recommend trying it ASAP. When produced, milk sugars caramelize in this soft, spreadable cheese, giving it a mildly sweet flavor. Its texture is identical to sculpting clay, it is virtually impossible to crumble, and it slices clean. Based on the result of this pizza, it also appears to have a higher melting point than most, though it does eventually get gooey.


The crust turned out well, though the rye flavor was less pronounced than I had hoped. Next time, I will adjust ratios to get something less hybrid. I left olive oil off this time, in effort to achieve that crackly, flour-dusted aesthetic.


Crust:
2 1/4 cups all-purpose flour
2 1/4 cups rye flour
1/2 cup warm water
1 1/3 cup room temperature water
2 1/4 tsp active yeast
Extra flour for dusting

Toppings:
24 oz tomato vodka sauce
5 oz Jarlsburg cheese
4 oz brunost cheese
1/2 tsp sea salt
1/2 tsp black pepper
1 tsp dried tarragon

Prepare the crust per my usual method: combine flours in a large bowl, sprinkle yeast over warm water and add to the flours once the yeast begins to foam. Add the additional water and mix well with a dough hook or by hand. Knead on a floured surface to form a ball, then place the dough in an oiled bowl to rise for an hour and a half.


If you are making tomato sauce from scratch, I recommend starting before the crust, or using a corner-cutting recipe. I used pre-made sauce this time, so there was virtually no prep work before the crust was ready. Once risen, split the dough into two pieces and form it with your hands or a rolling pin into a 12-14 inch circle. Heat oven to 500ºF.


Arrange your dough on a pizza stone or baking tray. I rolled my dough quite thin and folded over the edges to make a heftier crust, but this is optional. Bake the crust for 5-8 minutes, then remove and top with the sauce and cheeses. A standard-sized jar of tomato sauce is an ample supply for two pizzas this size. Spread the sauce evenly and grate the cheeses over the top. Sprinkle a little tarragon, sea salt and black pepper over everything. Return to the oven and bake for 12-15 minutes and you're done. Makes two pies, best when fresh.

Monday, June 13, 2016

6:16 / Sweet Sopresata

After a weekend out of the house, I return today with a late post. But all is well, because this pizza, while no-frills, is no filler. It is a beautiful marriage of sweet and savory red things, a good balance of saltiness, the sort of pie with no dud bites. The base of tomatoes is par for the course, and the salty sopresata pairs with sweet peppers like they were made for one another.


Sopresata, or sopresat, or whichever spelling you prefer, is one of the more favored cured meats on my cured meat radar. Growing up vegetarian, I was weaned on chicken around age 13 and probably did not even taste pork until my later teens [I honestly cannot pinpoint it]. There are swaths of meat culture and history of which I am either ignorant or under-informed. I made some bad assumptions, probably based on the media's portrayal of the stereotypically enthused carnivore's appreciation of the standalone flavor [see: the episode of Parks and Recreation where a slab of unaltered, economy beef on a white bun soundly defeated a from-scratch Asian fusion turkey burger in a taste test]. The first time I ate ground beef unseasoned, like the first time I tried steak, was kind of gross, and underwhelming after all that hype. Italian cured meats were something of a revelation; imagine, the concept of adding spices, herbs, and SALT to your meat! Like a lot of other things in life deserve, I gave animal protein another shot. If anyone is curious, I still eat beef so rarely that the amount can be rounded up to 0.01% of my diet, but at least now that is based on personal experience. And I am not judging anyone for liking meat that has not known the touch of a fennel seed or the caress of a peppercorn. I feel the same way about mangoes.


I am going to jump right into the recipe this week, because beyond what I have already said, I do not have much else to share about the ingredients. The crust is my typical one, and rather than try to make the same recipe sound fresh when it is literally the same one I have been using for weeks, I will just direct you to my post from two weeks ago [linked below].

Crust:
4½ cups all-purpose flour
2¼ tsp active yeast
½ cup warm water
1⅓ cup room temperature water
Extra flour for kneading

Toppings:
6 Roma tomatoes, seeded and roughly diced
6-8 oz sweet brined red peppers
6 oz sopresata
10 oz mozzarella cheese
Olive oil for brushing


Prepare the crust per the directions from my Cultivation Moon pizza [omitting the honey]: here. The toppings do not require much prep work, so you can leave them until the crust is done rising if you like. Give the oven plenty of time to heat to 500º F, and pre-heat your pizza stone if using one.


Seed the tomatoes and chop them into rough, semi-diced bits. The shapes do not have to be fancy unless you want them to. Dice the peppers likewise, but a bit smaller. Depending on the diameter of your sopresata, you may prefer to tear it into pieces, lay it out like traditional pepperoni, or, as I have done here, pull it apart and roll it into little cylinders.


When the crust is shaped and prepared, layer on the tomatoes, peppers, sopresata and mozzarella, cut into irregular chunks or round slices. Brush the crust with oil and season the top with a little extra salt and pepper to taste. Bake for 12-15 minutes until the crust reaches perfection. Makes two pizzas.

Wednesday, June 8, 2016

Orange Chicken with Sage and Wheat Berries

This recipe feels especially American to me. It ticks most of the nutritional boxes, makes for decent leftovers, and requires essentially no skill in the kitchen. All this and it also tastes good. Again, a bit of a seasonal flavor, and one that may be more appropriate to the winter months.


Oranges do bring the holidays to mind, but there is also something springy about citrus. It brightens whatever it touches, and adds sweetness without cloying. The orange is one of those great travelers, at home in savory dishes as much as in desserts. I also love the wheat berries here, another ingredient I have eaten a lot but seldom cook with. This recipe makes more wheat berries than necessary, so I recommend retaining some [about half] as a side.

Ingredients:
3 chicken breasts
6-8 oz orange juice
3 tbsp olive oil
1 large orange
2 tbsp currants [or dried cranberries]
3 tsp salt
3 tsp pepper
1 handful fresh sage leaves
1 cup wheat berries
2-3 cups water

In a casserole dish, lay the chicken breasts side by side. Season well with salt and pepper, then pour the orange juice and olive oil over them. Leave to marinate in the refrigerator for 1-4 hours, turning over once or twice to re-coat with the orange and oil mixture.

As the chicken marinates, cook the wheat berries. The method is the same as rice, though they do not need to fully absorb the water, so they are less fussy. In a medium saucepan, bring the wheat berries and water to a boil. Reduce the heat to low and simmer, covered, for 30-40 minutes. Check the berries then, but be aware they will probably take longer. I like to leave them a little chewy, and removed mine from the heat at 55 minutes. Cook longer for softer grains, simple stuff. Drain when they are done.


Heat the oven to 375ºF. Prep the chicken for roasting: cut the orange into thin slices, about 1/8 inch, and lay them over and around the chicken. Sprinkle the currants over the top, then about half the cooked wheat berries. Cover the dish with tin foil and roast for a 40 minutes. Remove the foil, baste the chicken [or spoon the juices over the meat], lay the sage leaves over each breast and continue roasting for 1 hour. Cooking times will vary depending on the thickness and size of your chicken. The meat I was using was quite thick, so rather than trusting the times I have noted, I do recommend checking the meat at least once every ten minutes after the initial 40 minutes.


The chicken should reach an internal temperature of at least 160ºF, but always check there are no pink bits before calling it done. Serve alongside green salad or extra wheat berries as a side. Serves 3-4 depending on hunger.


Saturday, June 4, 2016

5:16 / Monstruo Verde


First, a quick preamble: I am aware this pizza is not as green as I had intended. I think some of the color is lost in the baking process, but I had already settled on a name I liked, so it stays. I also want to clarify that this is not an homage to the Boston Red Sox or Fenway Park. At some point in the past week or so, salsa verde crept into my head, and I knew I had to put it on a pizza. Once I settled on a final recipe, it was quite spicy and I needed a title to convey that. I promise I just liked the name Green Monster.


By far the greatest benefit of taking on this blog has been getting to know new ingredients. The tomatillo, key ingredient in salsa verde, is one of these newcomers. A member of the physalis family along with the cape gooseberry and the Japanese lantern plant I am more familiar with, this little guy has a history dating back hundreds of years, and some of its relatives go back even further. The husk, papery but resilient in a spider's silk sort of way, is inedible. I looked into its purpose - maybe it developed to protect the insides from hungry vermin, or perhaps it carries nutrients to the fruit. Sadly, the internet provided no answers.


Whether the husk is an evolutionary remnant or the ancient Mesoamericans just dug a decorative cultivar, the little shroud ain't doing the tomatillo any harm. I may look into growing these in the future; they do not self-pollinate well, but provided there are multiple plants and a handful of bees around, I've heard they produce like gangbusters.


Cancha, or corn nuts, became a favorite of mine during my great ceviche kick of 2015. That is what I called my discovery of ceviches other than my personal go-to of tuna, mango and avocado [comment below if you would like to see this recipe!]. I have been to some restaurants that serve regular popcorn with their ceviche. Some serve this type of popped kernel. One delightful brunch spot in Brooklyn served both along with a tangy whitefish revelation. Once popped, cancha can be a little big for a pizza topping, so I gave them a whack in the mortar and pestle first. They are not widely available in typical grocery stores, but any Mexican or Latin American market will have a choice selection.


I did rein in my typically liberal use of spices to avoid an overwhelming mess. I love spice, but at a certain point it becomes so muddied you can no longer taste it. I used a little dash of cumin and chili powder, and otherwise stuck with salt for seasoning.


So, let's talk crust. With cancha up top, it felt right to get a corny base layer going. I kept the dry-wet ratios identical to the crust recipe I have had success with thus far, and subbed a bit of cornmeal for all purpose flour. I also used extra in the kneading, rolling and shaping stages. Pre-baking the crust with the right choice as well; my crusts have been trending pale while the cheese narrowly evades burning. My quest for a more bubbly crust goes on, but the results this week were a step forward.


Crust:

3½ cups all purpose flour
1 cup yellow cornmeal
2¼ tsp active yeast
½ cup warm water
1 cup room temperature water
Extra flour for kneading and dusting

Toppings:

6 tomatillos
3 small, yellow tomatoes
1 medium onion
3 jalapeño peppers
2 limes
¼ cup cancha [corn nuts]
½ tsp cumin
½ tsp chili powder
8 oz pepper jack, habanero or other spicy cheese
½ cup chopped cilantro
Olive oil for brushing


Prepare the crust. This method is essentially the same as the past few weeks: in a mixer with a dough hook, combine the flour and corn meal. Sprinkle yeast over the ½ cup of warm water and let it foam. Pour into the flour mix, along with the additional water. Mix on a medium-high speed until everything is incorporated and the dough forms a ball. Turn out onto a floured surface and knead for five minutes. Place in an oiled bowl and cover with plastic wrap. Leave to rise for an hour in a warm place.


Prepare the toppings, beginning with the salsa. Remove the husks on the tomatillos and rinse off any sticky residue. You can either dice the fruit or rough chop and then whizz through a food processor or blender. Whichever you choose, do the same with the onion.


In a large bowl, combine the diced or processed tomatillos and onion. Dice one jalapeño, removing about half the seeds [though feel free to use more if you prefer more spice]. Add the cumin, chili powder, and the juice of both limes and mix well.


Grate the cheese and set aside, then pop the cancha. I follow the same procedure as stovetop popcorn: a wide, shallow saucepan with a few tablespoons of canola oil, about ¼ cup cancha [this will leave plenty for both the pizza and snacking], lid on, over a high heat. As the cancha begin to pop, shake the pan to keep them moving, distribute the oil, and avoid burning. Once things quiet down and there is a second or two between pops, they are done.


The cancha will need to drain a bit, so allow them to cool on a plate with a paper towel to soak up excess oil. Sprinkle with salt. Give them a once-over in a mortar and pestle once they have cooled enough to handle.


Cut up the yellow tomatoes next. I do not fully dice them, but leave them in nickel-sized pieces as shown above. Slice the last two jalapeños. First, cut them lengthwise and remove the seeds [again, up to you]. Lay each half on the flat side and slice the peppers into thin crescents. I found it easiest to portion the toppings into small bowls in preparation for the pizza assembly. That way everything is read to go and I am not scrambling as the dough already begins to bake on the heated pizza stone.


After rising, punch down the dough and knead to remove any excess air. Allow the dough to rest for an additional 30 - 40 minutes under a towel. Heat the oven to 500º F and pre-heat your pizza stone if you are using one. When the half hour is up, bring the dough back out onto your floured surface and separate into two pieces. Roll or shape the dough with your hands, whatever works. As usual, this recipe makes two pies, each about 14 inches.


In terms of moving the dough from countertop or table to pizza stone, there are a few approaches. A pizza peel or a spatula with a wide surface area can aid here, but the dough will not stick too much if you use a ton of flour in the rolling/shaping process. It also helps to throw some more cornmeal on your pizza stone or baking sheet. I shaped the dough with my hands and a brief touch of the rolling pin to finagle a circle, then folded it in half and lifted gently onto the stone [sustaining no tears in the dough and only one, painful burn on the way!].


Before topping the pizza, bake it in the oven for 5 minutes. This helped me to achieve a darker crust this time around, but it is very likely the dough will puff up in the middle. You can either poke it with a fork a few times to allow it to vent, or ignore common sense and whack it with the flat side of a spatula like I did. This method deflated the bubble, but also broke the dough and sent a rush of piping hot air into my face. I leave it up to you to decide which works best.


After the five minute pre-bake, remove the dough from the oven and decorate it. Separate each topping into two equal portions for the two pies. I chopped a little cilantro and mixed that in with my olive oil before brushing the edges of the crust. Spread the salsa verde over the dough with a spoon, going close to the edges. Sprinkle on the yellow tomatoes, cheese and corn nuts, and top with the jalapeño slices.


Bake each pizza for ten minutes, until golden brown and melty. I recommend cooling for at least ten minutes more, this way the spice, and not the actual temperature, will be what melts your face.

Wednesday, June 1, 2016

Tofu Salad


Continuing from last week's theme, I wanted to include this simple tofu recipe, which is a nostalgic one for me. Equally delicious as a green salad topper, in a wrap, the centerpiece of a traditional sandwich, or just on its own, tofu salad used to be a staple for my family.


Sadly, it made fewer and fewer appearances on the household menu, and by the time I reached adolescence, it was a memory. I had to rediscover this multipurpose superhero as an adult, and it has become one of those things that is both oh-so-easy to whip up, and brings me joy whenever I see it in the fridge. The daikon is a new addition I brought in myself, but this is otherwise very similar to the tofu salad I grew up with. I know it will continue to evolve, and I will be sure to update on any future changes.


My tofu salad has a base of four ingredients. Tofu, carrots, onions, and daikon. In this recipe I expand on that a little with some wet ingredients that help bind the salad together for a texture similar to egg or tuna salad [but much tastier, I think]. This vegan salad will last at least few days in the fridge, but it goes so quickly when I make it I have never determined exactly how long it takes to go bad.


Ingredients:

16 oz firm tofu
½ medium onion
1 medium carrot
2-3 inch piece of daikon [~ cup when grated]
3 scallions
3 tbsp sesame tahini
2 tsp soy sauce
2 tsp mirin
1 tsp sesame oil


In a medium mixing bowl, crumble the tofu. Grate the carrot and daikon, dice the onion and mix with the tofu. Whisk the tahini, soy sauce, mirin and oil until combined. Stir the liquid mixture into the salad until everything is well coated and squishy. Serve however you like! I recommend spooning a dollop on top of salad greens and sprinkling sliced scallions on top.